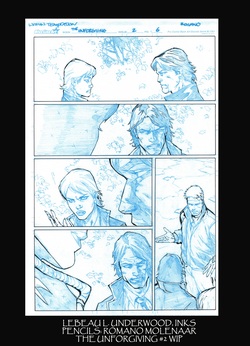
Here is the 2nd part. I first outline all of the contour lines on the figures. Taking this approach helps to ensure that you maintain the proper depth of your page, to give it both a 3D effect and 'pop'. I save the background work for last.
It helps to communicate with your penciler at this point. If that's not possible, ask the writer for a copy of the script: it's good to know where the action is occurring, as your job as the Inker is to lead the reader's eye to the action in every panel. Even on a page like this, with mostly dialogue, you can still use this tool. It takes time and ALOT of practice. But, if you are diligent and committed, it will happen. I use Hunt 103 crowquill, a 5.0 liner brush and a mixture of ink (Thanks to inking guru, Tim Townsend) that gives me the maximum density. Since I am working on bluelines, it helps 'sell' the page. Any thicker lines I go over again with the brush. Next up: Spotting your blacks properly.
It helps to communicate with your penciler at this point. If that's not possible, ask the writer for a copy of the script: it's good to know where the action is occurring, as your job as the Inker is to lead the reader's eye to the action in every panel. Even on a page like this, with mostly dialogue, you can still use this tool. It takes time and ALOT of practice. But, if you are diligent and committed, it will happen. I use Hunt 103 crowquill, a 5.0 liner brush and a mixture of ink (Thanks to inking guru, Tim Townsend) that gives me the maximum density. Since I am working on bluelines, it helps 'sell' the page. Any thicker lines I go over again with the brush. Next up: Spotting your blacks properly.
 RSS Feed
